


Short answer: You can practice meaningful parts of point-of-care ultrasound without an ultrasound machine. Off-machine training can reinforce the clinical question, probe selection, image orientation, protocol sequence, anatomy recognition, interpretation, and case reasoning. It cannot reproduce tissue contact, pressure, fine probe control, live image optimization, patient variability, or supervised competency assessment.
The goal is not to replace hands-on scanning. It is to arrive at your next supervised scanning session with fewer basic decisions competing for your attention.
- Use off-machine practice for cognitive rehearsal: indications, probe choice, orientation, protocol order, image recognition, and case reasoning.
- Use supervised scanning for physical performance: contact, pressure, ergonomics, fine probe movements, machine controls, and live image acquisition.
- Use direct observation and local processes for competence: an app score, completed lesson, or self-directed study plan does not establish clinical proficiency.
Can you practice POCUS without an ultrasound machine?
POCUS is not one isolated skill. It is a connected series of decisions: deciding whether a focused examination is appropriate, planning and acquiring an adequate image, interpreting that image, and integrating the result with the wider clinical situation.
The I-AIM framework organizes that sequence as Indication, Acquisition, Interpretation, and Medical decision-making. It is useful for off-machine training because it shows which decisions can be rehearsed on a screen and which skills still require a probe, an appropriate model or patient, and qualified supervision.
What off-machine practice can improve
Without a machine, you can rehearse how to:
- Turn a clinical problem into a focused ultrasound question.
- Choose an appropriate transducer for a simulated task.
- Predict a starting position and probe-marker direction.
- Recall the order of views in a defined protocol.
- Connect external probe position with expected internal anatomy.
- Recognize common structures, artifacts, and patterns in images or clips.
- Compare normal, abnormal, and technically limited examples.
- Decide when an image is inadequate for interpretation.
- Work through educational cases and review errors over time.
What it cannot reproduce
A phone, video, flashcard deck, or software-only simulator cannot fully reproduce:
- Skin and tissue contact, changing pressure, and acoustic coupling.
- Coordinating the scanning hand with machine controls.
- Fine sliding, rotating, rocking, tilting, fanning, and sweeping movements.
- Patient positioning, discomfort, movement, and body-habitus variation.
- Live depth, gain, focus, and window optimization.
- Distinguishing a true finding from poor acquisition in a real examination.
- Consent, infection control, documentation, archiving, and quality assurance.
- Direct observation, formal assessment, or credentialing.
The distinction matters. The American College of Emergency Physicians’ ultrasound guidelines describe competency as a progression from knowledge to image acquisition, interpretation, and clinical integration. They identify hands-on instruction, supervised examinations, quality review, and feedback as central parts of training, while simulation and asynchronous learning serve as complementary methods.
| POCUS task | Useful without a machine? | What is still required |
|---|---|---|
| Frame a focused question | Yes | Application within scope and the full clinical context |
| Select a probe | Yes | Confirmation on the actual ultrasound system |
| Plan position and orientation | Yes | Hands-on positioning and movement feedback |
| Recall a protocol sequence | Yes | Supervised execution across varied anatomy |
| Recognize image patterns | Yes | Adequate live-image acquisition and clinical correlation |
| Practice educational case reasoning | Yes | Clinical supervision and a complete patient assessment |
| Develop pressure and contact control | No | A real probe with an approved model or patient |
| Demonstrate competency | No | Formal assessment under applicable local requirements |

Rehearse POCUS concepts without waiting for a machine.
POCUS Simulator guides you through probe choice, positioning concepts, image recognition, interpretation, and case feedback for eFAST, FoCUS, and lung-ultrasound content. Educational simulation only; not a clinical competency assessment.

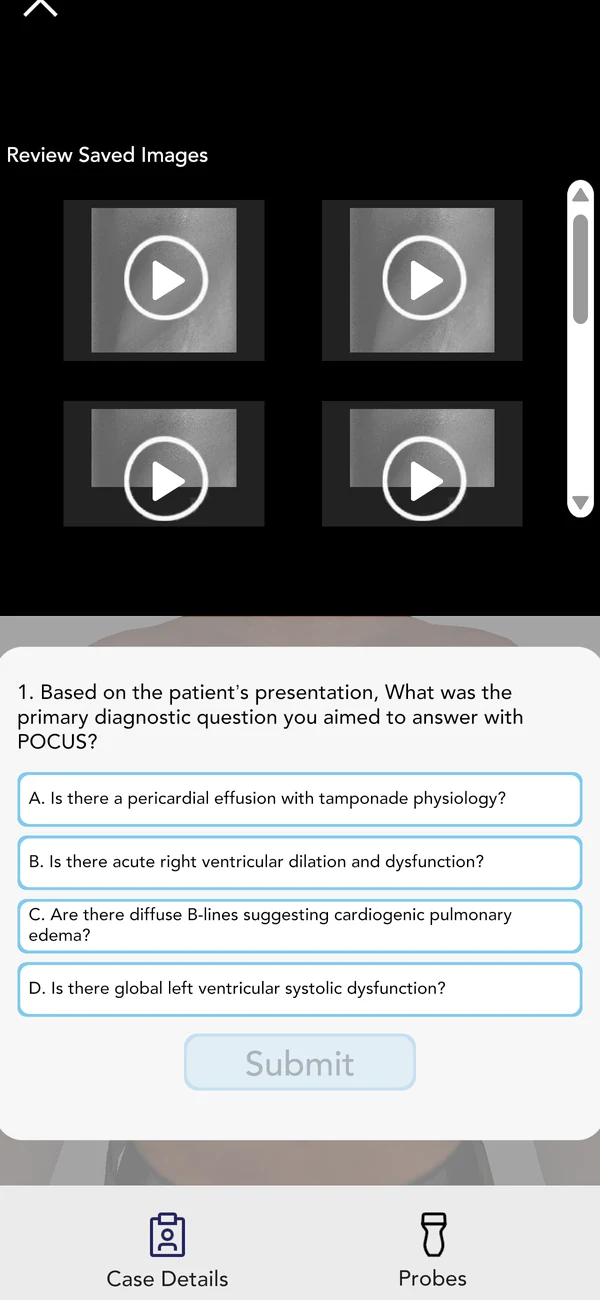

Choose the right format: Compare the role, benefits, and limits of POCUS simulation training.
Use the I-AIM framework to organize POCUS practice
A useful off-machine session should follow the same mental order as a focused examination. I-AIM provides that order.
Indication
Begin with a focused question rather than a protocol name. Ask what the examination is intended to address, whether the application is appropriate for that question, what it can reasonably show, and which limitations or alternative evaluations remain.
For an educational case, write the focused question before viewing the images. This keeps pattern recognition connected to context.
Acquisition plan
Without a machine, you are practicing an acquisition plan, not demonstrating image-acquisition skill. Before revealing the target view, state:
- Which probe you would choose and why.
- Where you would begin.
- Which direction the probe marker should face under your program’s convention.
- Which structure or acoustic window you are trying to find.
- Which single movement you would try first if the target were not visible.
Build the movement vocabulary: Review the visual guide to sliding, rotating, rocking, tilting, fanning, and sweeping.
Understand the controls: Review the ultrasound physics behind frequency, depth, gain, focus, and artifacts.
Interpretation
Interpretation practice should include more than naming a diagnosis. For every image or clip, ask:
- Is the view adequate for the focused question?
- Which landmarks confirm its orientation?
- What is definitely visible?
- What is not adequately shown?
- Is the example normal, abnormal, or indeterminate?
- Which artifact or technical problem could mislead you?
“Indeterminate” is an important answer. Off-machine practice becomes misleading when every image is treated as interpretable or every case is forced into a diagnosis.
Medical decision-making
Inside a simulated case, explain how the ultrasound finding would fit with the other information provided. Then state what the image alone cannot establish. A focused ultrasound result does not replace history, examination, monitoring, laboratory testing, consultative imaging, or specialist input when those are needed.
If you are not trained and credentialed to use POCUS clinically, keep this step inside educational cases and discuss the reasoning with a qualified instructor.
What you need to begin
- One focused application. Choose an application relevant to your curriculum and one for which supervised practice will eventually be available.
- A trusted case or image source. Use an institutionally approved image library, a reputable educational resource, or a simulator with clear explanations.
- An error log. Record decisions, uncertainty, and recurring mistakes rather than only a score.
- Fifteen to twenty focused minutes. One deliberate session is more useful than a long, distracted review.
- A future hands-on opportunity. Off-machine learning works best when it prepares for or reinforces supervised practice.
Do not begin by trying to memorize every POCUS protocol. Narrow practice makes it easier to connect the clinical question, target view, anatomy, interpretation, and limitations. If you need a foundation first, review what POCUS is and how it fits bedside care and the beginner scanning habits that make supervised practice more productive.
A 7-day POCUS practice plan without a machine
This is a practical study structure, not a validated credentialing curriculum. Adapt it to your specialty, training level, local program, and supervisor’s expectations.
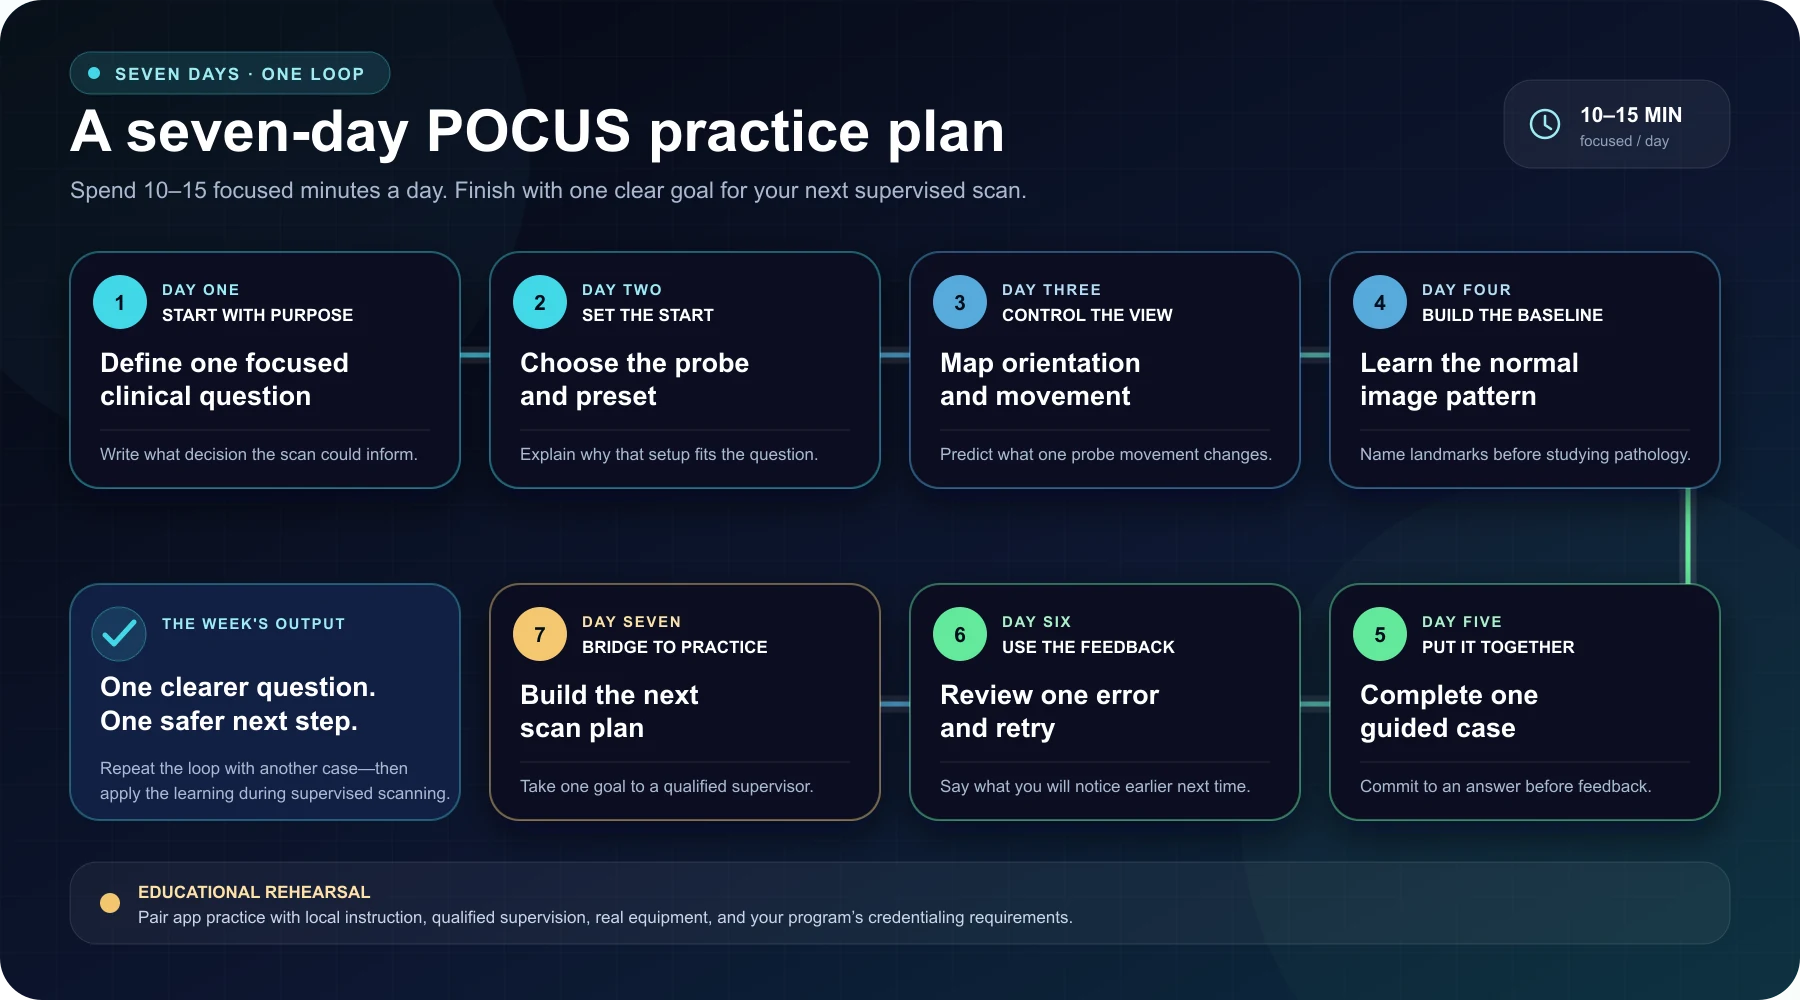
| Day | Focus | Suggested time | Tangible output |
|---|---|---|---|
| 1 | One clinical question and protocol map | 15–20 minutes | One-page sequence |
| 2 | Probe, marker, position, and movement | 15–20 minutes | Orientation map |
| 3 | Normal target views | 15–20 minutes | Annotated landmarks |
| 4 | Normal, abnormal, and indeterminate images | 15–20 minutes | Ten committed interpretations |
| 5 | Complete educational cases | 20–30 minutes | Three case debriefs |
| 6 | Error-focused repetition | 15–20 minutes | Prioritized error log |
| 7 | Transfer to supervised scanning | Varies | Pre-brief and feedback goal |
Day 1: Build one protocol map
Choose one application that fits your training program, such as a limited lung-ultrasound sequence, eFAST, or focused cardiac ultrasound. Write the focused question, usual probe, views in order, major landmarks, common limitations, and what would make the examination technically inadequate.
If you choose lung ultrasound, use the A-lines vs B-lines guide as a focused artifact-recognition reference for this exercise.
Close the reference and redraw the map from memory. Then compare it with the source and correct it in a different color. Retrieval is the useful step; polishing notes is not.
Day 2: Rehearse probe choice, marker, and movement
For each view, state the transducer, starting position, marker direction, expected screen orientation, and the first small movement you would try if the target were off-center. A phone or neutral object can reinforce directional vocabulary, but it cannot reproduce pressure, acoustic contact, ergonomics, or coordination with a live image.
Day 3: Learn the normal target view
Select five to ten representative normal images or clips. Confirm view adequacy, identify orientation landmarks, label the target anatomy, describe expected motion if the image is dynamic, name one common artifact, and state what would make the view inadequate. Use more than one example so that “normal” does not become one memorized picture.
Day 4: Compare normal, abnormal, and indeterminate images
Build a mixed set containing normal examples, one common abnormal pattern, and technically limited images. Commit to normal, abnormal, or indeterminate before revealing the explanation. When you miss, classify the reason: orientation, landmark, artifact, inadequate view, interpretation, or unsupported guessing.
Day 5: Work through complete cases
Move from isolated images to cases. For each case, state the focused question, choose the probe, predict the window and marker direction, list the view sequence, interpret the images, commit to an educational next step, and review the feedback and limitations.
Complete two or three cases slowly. Thoughtfully repeating one missed case is more valuable than racing through many cases for a higher score.
Day 6: Train your mistakes
Select the three most frequent errors from the week. For each, write the incorrect assumption, the cue you missed, and the corrected rule in one sentence. Find two new examples that test the same distinction, then retest yourself without labels.
An error such as “I interpreted the image before checking whether the view was adequate” gives you a specific behavior to change. A score alone does not.
Day 7: Bridge the plan to supervised scanning
Before an approved hands-on session, tell the instructor which application you reviewed, which view is most difficult, which physical skill you want observed, and which interpretation error you are trying to avoid.
During the session, focus on one physical objective, such as maintaining orientation during rotation or distinguishing a contact problem from excessive depth. Ask for feedback on ergonomics, pressure, movement, machine controls, and image adequacy. Afterward, review educational images if local policy permits, record one acquisition correction, and schedule the next supervised repetition.
A systematic review of POCUS competency retention found that image-acquisition skills showed the greatest deterioration across the I-AIM domains and recommended longitudinal, multimodal education with supervised scanning for acquisition. That is why Day 7 is the bridge rather than an optional extra.
The four-step loop for every practice session
- Preview the question. Define the focused question and what is outside the examination’s scope.
- Predict the acquisition plan. Choose the probe, window, marker direction, target anatomy, and first corrective movement before seeing the answer.
- Commit to an interpretation. Decide whether the view is adequate and whether the example is normal, abnormal, or indeterminate. Name the landmarks supporting the answer.
- Debrief the gap. Compare your reasoning with the explanation. Record why you missed it and which cue should change the next attempt.
This loop turns passive content into retrieval and decision practice. If you only watch an instructor obtain a view or reveal a labeled image, you may recognize the explanation without being able to generate it yourself.
How to make off-machine POCUS practice more effective
Choose active recall over passive review
Pause before every label, answer, or demonstration. Predict what comes next. Retrieval exposes uncertainty that can remain hidden while watching a fluent instructor.
Mix representative examples
Do not practice only the clearest pathology. Include multiple normal examples, different orientations and depths, common artifacts, technically limited views, and cases in which ultrasound does not answer the entire question.
Use immediate, explanatory feedback
A correct answer without an explanation can reinforce guessing. Useful feedback identifies the landmark, explains why alternatives are wrong, and states the limits of the image.
Keep an error log
Track the type of error, not just the score. Recurrent orientation mistakes require a different response from missed anatomy or overinterpretation of an inadequate view.
Revisit material over time
Short repeated sessions are practical for reinforcement, but there is no universal number of app sessions that establishes competence. Use repetition to support retention while continuing supervised scanning and formal assessment.
Practice uncertainty
Safe interpretation includes recognizing when the available image is inadequate. Build “indeterminate” and “additional information needed” into your practice vocabulary.
A scoping review of undergraduate POCUS education found that programs commonly combine supervised practice, simulation, didactics, active learning, and educational technologies. The practical lesson is not that one method replaces the others; different methods train different parts of the skill.
How to transition to hands-on scanning
When access to a machine becomes available, use the time for skills that cannot be learned from a screen.
Before the session
- Review the focused question and protocol sequence.
- Choose one image-acquisition objective.
- Confirm who will supervise and how feedback will be provided.
- Review local consent, infection-control, privacy, and documentation rules.
During the session
- Ask the supervisor to observe hand position and ergonomics.
- Make one deliberate probe movement at a time.
- Explain what you expect to change before moving.
- Optimize the view before interpreting it.
- State when the image is inadequate.
- Request feedback on both acquisition and interpretation.
After the session
- Review images through an approved quality process.
- Compare your interpretation with the supervisor’s.
- Record one specific correction for the next session.
- Continue off-machine rehearsal between scanning opportunities.
The 2024 interdisciplinary POCUS best-practices consensus distinguishes educational scans from clinically indicated examinations and addresses structured training, supervision, image review, and local credentialing. Your program’s requirements—not an online article or app—determine when and how you may use POCUS in patient care.
Make the next hands-on session easier to use well.
Rehearse the question, probe choice, position, image, and decision sequence with guided mobile cases. Then take one clearly defined acquisition goal to your instructor.
Common mistakes to avoid
Treating an app score as competency
A score reflects performance inside one educational environment. It does not establish that you can acquire adequate images across different patients or integrate POCUS safely into care.
Watching without making decisions
Videos can demonstrate a scan, but uninterrupted viewing provides few opportunities to retrieve the sequence, identify uncertainty, or correct a mistaken assumption.
Learning pathology before normal anatomy
Without a stable understanding of normal landmarks and artifacts, unfamiliar patterns are easily mislabeled as abnormal.
Studying only perfect images
Real images vary. Practice should include incomplete windows and technically limited examples so that view adequacy becomes part of interpretation.
Learning too many protocols at once
Breadth can feel productive while preventing the repeated retrieval needed to stabilize one workflow.
Forcing a diagnosis from an inadequate view
An unclear image is not automatically normal. “Indeterminate” or “another view is needed” may be the correct educational conclusion.
Safety and limitations
- Use simulation and image review for education, not independent patient diagnosis or treatment.
- Do not use an app result, quiz score, or course-completion badge as evidence of clinical competence.
- Software-only simulation cannot reproduce all physical and patient-specific components of acquisition.
- Do not perform ultrasound-guided procedures based on self-directed simulation practice.
- Scan patients or volunteers only when permitted by your role, supervisor, institution, and local policy.
- Obtain appropriate consent and follow infection-control practices.
- Do not save, upload, or share identifiable clinical images outside approved systems.
- Use supervision and quality review while developing acquisition skills.
- Follow the training, privileging, credentialing, and continuing-competence requirements for your setting.
A small 2019 prospective study of a kidney-ultrasound augmented-reality app found more accurate kidney measurements after app exposure than after textbook preparation alone. However, it involved 66 medical students, one simulated patient and one application; it did not show faster examinations or establish broad POCUS competence. That is the appropriate evidence boundary for mobile simulation: potentially useful as an addition to training, not a replacement for the complete pathway.
Frequently asked questions
Can I learn POCUS without an ultrasound machine?
You can learn and rehearse indications, probe selection, orientation, protocol order, anatomy recognition, interpretation, and educational case reasoning without a machine. You cannot fully develop live image-acquisition skill or demonstrate competence without appropriate hands-on practice, supervision, feedback, and assessment.
Is a POCUS simulator enough for a beginner?
No. A simulator can prepare a beginner for scanning and reinforce concepts between sessions, but it cannot reproduce every aspect of contact, pressure, ergonomics, machine controls, or patient variation. Use it as one part of a blended learning plan.
What should a POCUS beginner practice first?
Begin with one application relevant to your curriculum. Learn its focused question, normal anatomy, probe choice, marker direction, standard sequence, image-quality criteria, common artifacts, and limitations before adding several pathologies or protocols.
How often should I practice POCUS?
There is no universal self-study schedule that proves competence. A practical starting pattern is 15 to 20 minutes of active rehearsal several times per week, combined with regular supervised scanning. Adjust the schedule based on instructor feedback, performance, and local curriculum requirements.
Can I practice ultrasound probe movements with a phone?
A phone or neutral object can help you visualize probe orientation and understand sliding, rotating, rocking, tilting, and fanning. It cannot reproduce tissue pressure, acoustic contact, ergonomics, or coordination with a changing live image.
Which POCUS protocol should I learn first?
Choose the application most relevant to your role and the one for which qualified instruction and supervised practice are available. Lung ultrasound, eFAST, and focused cardiac ultrasound are common teaching areas, but the correct starting point depends on your curriculum and scope.
Does off-machine practice count toward certification or credentialing?
Self-directed image review or app practice does not by itself satisfy supervised-scan or competency-assessment requirements. Requirements vary across specialties, institutions, and jurisdictions, so confirm them with your training program or credentialing body and review the current POCUS certification pathways.
Do I need to buy a handheld ultrasound device to begin learning?
Not necessarily. Begin with structured education and access to qualified supervision. If you later consider equipment, compare image quality, supported applications, service, data handling, and training access—not price alone. See the portable-ultrasound guide for a current comparison.
Has the Ultrasound Fanatic POCUS Simulator been clinically validated?
The published studies cited here support simulation and mobile learning as educational approaches; they are not validation studies of POCUS Simulator by Ultrasound Fanatic. The app is designed for guided cognitive rehearsal, protocol review, image interpretation, and educational cases. It is not a diagnostic device or competency assessment.
Prepare now, then scan under supervision
The useful question is not whether an app can teach all of POCUS. It cannot. The useful question is which decisions you can rehearse now so that supervised scanning time is spent on the physical skills that actually require a probe, machine, appropriate model or patient, and instructor feedback.
Use off-machine practice to define the question, organize the protocol, choose the probe, understand orientation, recognize representative images, and expose reasoning errors. Then use supervised scanning to develop contact, movement, optimization, adaptability, and reliable image acquisition.
Continue the learning loop: practice a guided mobile case, compare other POCUS simulator formats, review the probe-movement guide, or find an ultrasound course or workshop.
Selected authoritative references
- Bahner DP, Hughes D, Royall NA. I-AIM: A Novel Model for Teaching and Performing Focused Sonography. Journal of Ultrasound in Medicine. 2012.
- American College of Emergency Physicians. Ultrasound Guidelines: Emergency, Point-of-Care, and Clinical Ultrasound Guidelines in Medicine. 2023.
- Oto B, et al. Best Practices for Point of Care Ultrasound: An Interdisciplinary Expert Consensus. POCUS Journal. 2024.
- Wang L-W, Liu C-H, Yang C-W. Is Ultrasound Training Sustainable? A Systematic Review of Competency Retention in Healthcare Trainees. Medical Education. 2025.
- Teaching Methodologies and Educational Outcomes of Point-of-Care Ultrasound in Undergraduate Medical Education: A Scoping Review. 2026.
- Ebner F, et al. Effect of an Augmented Reality Ultrasound Trainer App on the Motor Skills Needed for a Kidney Ultrasound: Prospective Trial. JMIR Serious Games. 2019.