


POCUS for beginners is best learned as a repeatable process—not a collection of disconnected tricks. Start with a focused clinical question, select the correct probe and preset, confirm orientation, optimize the image in a consistent order, scan systematically, and review saved studies with qualified feedback. A recognizable frame is only one step; safe POCUS also requires appropriate indication, adequate acquisition, careful interpretation, clinical integration, documentation, and knowing when the examination is limited.
The beginner formula: one focused question + one standardized acquisition sequence + one honest assessment of image adequacy + one feedback target for the next scan.
1. Begin with a focused question
Do not begin by asking, “What can I find if I put the probe here?” Begin with a defined question that is relevant to the patient’s presentation and within the scope of the examination you have been trained to perform.
The I-AIM framework—indication, acquisition, interpretation, and medical decision-making—was created as a structured approach to focused sonography. The original I-AIM publication describes it as both a mnemonic and checklist. For a beginner, the indication step should answer four questions:
- What focused clinical question is this examination designed to address?
- What standard views are required?
- What are the important limitations and potential mimics?
- What is the next step if the result is positive, negative, technically limited, or indeterminate?
POCUS should not be performed simply because a machine is available. A clear question makes it easier to choose the protocol, recognize whether the study is complete, and avoid extending an answer beyond the examination’s validated scope.
If you are new to the entire field, first read What is POCUS? A practical point-of-care ultrasound guide for the definitions, I-AIM workflow, application map, safety principles, and training pathway behind these tips.
2. Learn normal anatomy before chasing pathology
Abnormal images are memorable, but normal anatomy supplies the landmarks that make abnormal findings interpretable. Before trying to diagnose a condition, learn to identify the required structures in each standard view and recognize when the view is incomplete.
A reliable normal-anatomy routine includes:
- Identify the superficial-to-deep tissue layers.
- Find the major landmarks in a consistent order.
- Trace or sweep through the full target instead of stopping at one still frame.
- Acquire the required orthogonal or complementary views for that protocol.
- Note normal motion, compressibility, echogenicity, and artifacts relevant to the application.
- Compare with the opposite side or a second window when the approved protocol calls for it.
Normal variants, artifacts, and incomplete views can resemble pathology. Review uncertain images with an experienced instructor rather than reinforcing an incorrect pattern independently.
3. Match the probe and preset to the target
Probe selection is a trade-off among frequency, penetration, spatial detail, footprint, and the available acoustic window. Start with the target’s depth and location rather than memorizing one probe as “the POCUS probe.”
| Probe | Useful beginner mental model | Common educational examples |
|---|---|---|
| Linear array | Higher frequency and strong superficial detail with less deep penetration | Vascular, superficial soft tissue, musculoskeletal structures, and selected procedures |
| Curvilinear array | Lower frequency and broad abdominal field for deeper structures | Abdominal, pelvic, renal, biliary, and trauma views |
| Phased array | Small footprint and sector image suited to intercostal windows | Focused cardiac and selected thoracic views |
Presets adjust multiple controls for an intended examination. Choose the appropriate preset first, then optimize. If your device uses a single multipurpose transducer, you still need to select an appropriate preset or frequency range.
Higher-frequency sound generally improves detail but loses penetration; lower-frequency sound penetrates farther but provides less fine detail. The reasoning behind this trade-off is explained in 10 ultrasound physics principles for better POCUS images.
4. Confirm orientation every time
The orientation marker on the probe corresponds to a marker on the image. Before beginning a study, touch or move one side of the probe and confirm that the expected side of the screen responds. This simple check prevents an unnoticed mismatch between physical and displayed orientation.
Conventions are not identical across every specialty. Cardiac and noncardiac workflows may display the marker on different sides of the screen. The AIUM POCUS practice parameter explicitly notes this difference. Follow the convention used by your curriculum, specialty, and institution; do not switch silently between conventions.
Orientation checklist
- Confirm the probe marker.
- Confirm the screen marker.
- State or know the patient plane being displayed.
- Use the same convention as your instructor and clinical system.
- Label and store images according to local policy.
5. Anchor your hand and make one small movement at a time
Large, unsupported movements make the image unstable and make it difficult to understand what changed. When clinically appropriate, brace part of your scanning hand against the patient or another stable surface, keep the wrist neutral, position the machine where it can be viewed comfortably, and use enough gel to maintain acoustic contact.
Learn the movement vocabulary deliberately:
| Movement | What changes | Beginner cue |
|---|---|---|
| Slide | The entire footprint moves across the skin | Move to a new window while preserving orientation |
| Rotate | The probe turns around its central axis | Change the imaging plane while keeping the target centered |
| Rock | The beam moves along the probe’s long axis | Center a target without sliding away from the window |
| Tilt or fan | The beam moves along the short axis | Scan through adjacent tissue from one contact point |
| Sweep | The beam travels systematically through the target | Evaluate a volume, not a single screenshot |
| Compression | Controlled pressure changes tissue shape or apposition | Use only when indicated, tolerated, and taught for that application |
If the image suddenly disappears, stop. Return to the last recognizable landmark, restore the previous position, and change one movement at a time. This creates a clearer connection between hand motion and image response.
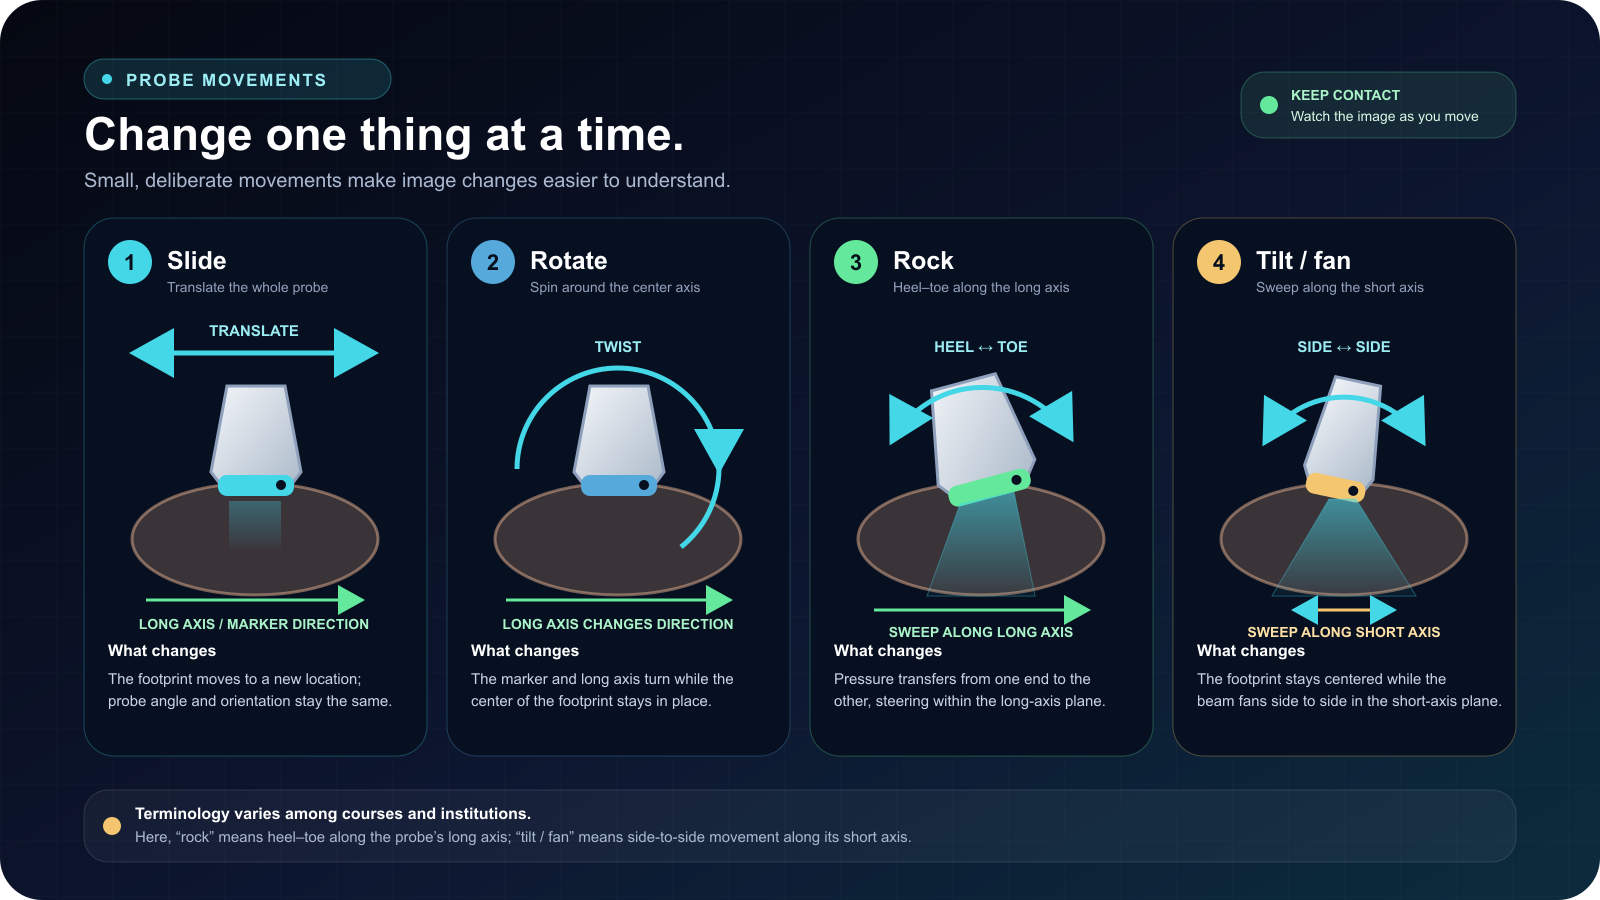
Go deeper: See the complete visual guide to ultrasound probe movements and orientation.
6. Optimize the image in a consistent order
Randomly turning controls creates accidental improvements that are difficult to repeat. Start with the correct probe and preset, then use a short optimization sequence. One practical beginner order is depth → gain → focus → position, followed by application-specific controls.
Depth
Set the image deep enough to include the full target and the landmarks needed to interpret it, but avoid an excessive far field that makes the target unnecessarily small. If you cannot see the deep boundary of the structure or required surrounding anatomy, the image is too shallow. If the target occupies only a small portion of the screen, it may be too deep.
Overall gain
Gain amplifies received echoes and changes overall brightness. It does not create information that was never acquired. Too much gain can fill fluid with false internal echoes and obscure boundaries; too little gain can hide weak reflectors.
Time gain compensation
TGC changes amplification at different depths. Use it to correct uneven brightness through the image rather than treating it as a replacement for overall gain, frequency, positioning, or an adequate acoustic window.
Focus
Place the focal zone at or just beyond the target according to the application and system. Lateral resolution is generally best near the focal region. Avoid adding unnecessary focal zones when frame rate matters.
Position and window
Controls cannot fix every poor acoustic window. Reposition the patient when appropriate, adjust the probe angle, use respiration or another approved maneuver when taught, add gel, or find an alternative window. The ACEP Sonoguide physics chapter provides a practical introduction to these controls and movements.
A fast troubleshooting table
| Problem | First checks | Avoid |
|---|---|---|
| Target is tiny | Reduce unnecessary depth; improve the window; center the structure | Zooming before confirming the full required anatomy |
| Everything is dark | Check gain, preset, contact, frequency, and whether the probe is active | Immediately increasing acoustic output |
| Far field is dark | Check TGC, frequency, depth, attenuation, and window | Overgaining the entire image and obscuring the near field |
| Fluid is filled with echoes | Reduce gain; check artifact and motion; review the view | Calling internal material from one overgained frame |
| Structure changes brightness with angle | Consider anisotropy; adjust insonation angle and confirm in another plane | Interpreting angle-dependent darkness as pathology without review |
7. Scan systematically and confirm in complementary views
One attractive frame is not a complete examination. Follow the standard sequence for the application, sweep through the relevant anatomy, and obtain orthogonal or complementary views when the protocol requires them. A systematic approach reduces the risk of stopping after the first easy window while missing a required region.
Before interpreting, ask:
- Did I obtain every required view?
- Are all required landmarks visible?
- Did I scan through the full target rather than save one frame?
- Is the orientation correct?
- Are depth, gain, focus, and motion adequate?
- Could artifact or a normal variant explain the appearance?
- Do I need another plane, window, comparison, or expert review?
The AIUM parameter emphasizes that incomplete examinations or incidental findings requiring further evaluation should prompt an appropriate comprehensive study. “Technically limited” and “indeterminate” are valid conclusions; neither means normal.
8. Interpret the image within the full clinical context
Image interpretation is not the final step. The I-AIM model ends with medical decision-making because a POCUS result must be integrated with the patient’s presentation, examination, laboratory data, and other imaging.
Use disciplined language:
- Describe adequacy: which views were obtained and which were limited?
- Describe the finding: what is actually visible, without jumping beyond the protocol?
- State uncertainty: what artifact, mimic, or missing view limits confidence?
- Compare with the clinical picture: does the finding plausibly address the original question?
- Escalate appropriately: is expert review, repeat scanning, comprehensive imaging, or another test required?
The 2024 interdisciplinary consensus notes that POCUS is generally more targeted and less comprehensive than other imaging workflows and that it may or may not replace other testing depending on the context. Avoid letting a visually satisfying image create confidence beyond the evidence.
9. Save clips, review errors, and seek qualified feedback
Progress comes from corrected practice. Save representative, labeled images or clips according to local privacy and archiving policy. Ask an instructor to review acquisition quality, anatomy, interpretation, and the way the result was integrated—not just whether your final answer matched.
A useful feedback log tracks:
| Domain | Question to record |
|---|---|
| Indication | Was this the right focused examination for the question? |
| Acquisition | Which view, landmark, movement, or control most limited image quality? |
| Interpretation | What normal variant, artifact, or pathology pattern did I misread? |
| Integration | Did I apply the result within its scope and the full clinical context? |
| Next repetition | What one behavior will I deliberately change on the next scan? |
Do not confuse scan totals with competence
Some specialty pathways use minimum scan counts, but numbers alone do not show whether a learner can select an appropriate examination, acquire adequate views, interpret accurately, integrate findings, or recognize limitations. A 2024 systematic review of POCUS psychomotor learning curves found that learning curves and endpoints differ among applications and that validated definitions of competence or plateau points remain limited.
The interdisciplinary consensus recommends combining experience requirements with qualitative evaluation of knowledge and practical skills. Seek direct supervision early, then ongoing review as required by your local training and credentialing pathway.
10. Practice longitudinally—and keep every session safe
A single workshop can introduce an application, but skills need reinforcement. A 2025 systematic review of POCUS competency retention found variable decay across competency domains and particularly pronounced deterioration in acquisition skills after short-course programs. Build repeated practice, feedback, and review into the learning plan.
Longitudinal practice does not mean scanning without boundaries. Each session should follow consent, supervision, privacy, infection-control, and acoustic-safety requirements. For educational scanning on participants or patients, use the applicable institutional policy and professional guidance.
Use ALARA
The AIUM ALARA statement recommends using the lowest acoustic output that provides the needed information, monitoring thermal and mechanical indices, avoiding unnecessary stationary dwell time, and limiting overall scan time. Gain changes received-signal amplification; it is not the same as transmitted output.
Clean the entire system
Follow manufacturer instructions and local infection-control policy. The AIUM 2025 transducer and gel guidance calls for cleaning and low-level disinfection of external transducers between patients, high-level disinfection and a single-use cover for internal probes, and additional precautions for invasive procedures, nonintact skin, and gel use. Cables, controls, screens, and other contaminated surfaces also require attention.
A four-week beginner practice framework
This framework organizes early practice; it is not a promise of competence after four weeks. Adjust the pace to the application, learner, supervisor, and institutional curriculum.
| Week | Primary goal | Example work |
|---|---|---|
| 1 | Orientation and normal landmarks | Probe marker, screen convention, standard planes, normal anatomy, and one application-specific view sequence |
| 2 | Image acquisition and optimization | Supervised probe movements; depth, gain, focus, window, and adequacy review |
| 3 | Interpretation within cases | Normal versus selected findings, artifacts, limitations, and I-AIM integration using reviewed cases |
| 4 | Remediation and assessment | Review saved clips, identify recurring errors, repeat difficult views, and complete the program’s required assessment |
Use mobile or web-based cases between hands-on opportunities for knowledge and image-interpretation rehearsal. A scoping review of online POCUS education found that online learning was useful for knowledge and image interpretation, while online-only image acquisition was less consistently effective. That is why simulation should prepare for and reinforce supervised scanning rather than replace it.
Common beginner mistakes to catch early
- Scanning without a focused question.
- Using the wrong probe or preset and compensating with excessive controls.
- Forgetting to confirm orientation.
- Moving the probe in several directions at once.
- Stopping at the first recognizable frame instead of sweeping the full target.
- Saving a finding without an adequate normal landmark or complementary view.
- Using gain to hide poor contact or a poor acoustic window.
- Calling a technically limited examination negative.
- Generalizing a focused result beyond the protocol’s scope.
- Tracking scan totals without reviewing image quality and interpretation.
- Practicing independently before meeting supervision and credentialing requirements.
- Cleaning the probe but forgetting cables, controls, screen, or contaminated gel containers.
Frequently asked questions for POCUS beginners
What is the best probe for a beginner?
There is no universal best probe. Choose the probe that matches the application, target depth, required footprint, and available window. A linear probe is useful for superficial anatomy, a curvilinear probe for many deeper abdominal views, and a phased-array probe for small intercostal windows such as focused cardiac imaging.
How many scans do I need before I am competent?
No single number proves competence across all applications. Specialty and institutional pathways may require minimum numbers, but these should be combined with qualitative assessment of indication, acquisition, interpretation, integration, and limitations. Follow the standards that apply to your role and clinical environment.
Why is my ultrasound image too dark?
Check the active probe and preset, probe–skin contact, overall gain, TGC, frequency, depth, and acoustic window. Do not immediately increase acoustic output. If the far field alone is dark, consider depth-dependent attenuation, frequency, TGC, and whether another window is available.
How do I know whether an image is good enough?
An adequate image shows the required landmarks, depth, orientation, and full target for that protocol, with settings that permit interpretation. Adequacy is application-specific, so learn its criteria from qualified supervision and current specialty guidance. If a required structure or view is missing, document the limitation.
Can I practice POCUS without a machine?
You can practice anatomy, physics, probe-selection concepts, positioning, protocol sequence, image interpretation, and case reasoning with diagrams, saved clips, or simulation. Real acquisition skill requires an ultrasound system and supervised hands-on practice because a screen or phone does not reproduce real tissue, pressure, ergonomics, patient movement, or live image optimization.
Should I learn several protocols at once?
Most beginners benefit from concentrating on one clinically relevant application long enough to build reliable landmarks, views, optimization, and feedback habits. The appropriate sequence depends on the learner’s specialty and formal curriculum.
What should I do when the images do not fit the clinical picture?
Reassess image adequacy, orientation, artifacts, protocol completeness, and the limits of the examination. Seek qualified review and obtain the appropriate additional test when uncertainty could affect care. POCUS findings should be integrated with the entire clinical picture, not used as an isolated verdict.
Selected authoritative references
- Oto B, et al. Best Practices for Point of Care Ultrasound: An Interdisciplinary Expert Consensus. 2024.
- AIUM Practice Parameter for the Performance of Point-of-Care Ultrasound Examinations.
- Bahner DP, Hughes D, Royall NA. I-AIM: A Novel Model for Teaching and Performing Focused Sonography. 2012.
- Breunig M, Chelf C, Kashiwagi D. Point-of-Care Ultrasound Psychomotor Learning Curves: A Systematic Review. 2024.
- Wang L-W, et al. Is Ultrasound Training Sustainable? A Systematic Review of Competency Retention. 2025.
- Harel-Sterling M. Can You Teach a Hands-on Skill Online? A Scoping Review of E-learning for POCUS. 2023.
- ACEP Sonoguide. Ultrasound Physics and Technical Facts for the Beginner.
- AIUM. As Low As Reasonably Achievable (ALARA) Principle.
- AIUM. Guidelines for Cleaning Ultrasound Transducers and Safe Handling of Coupling Gel. 2025 revision.